

have questions?
Always the correct part
We know our products
Fast & Reliable


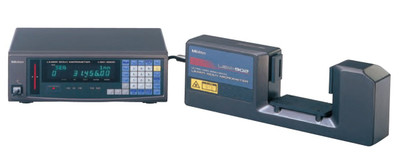
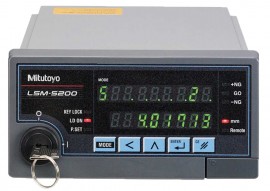
Make system integration simple with this panel mount design display that supports odd fluted parts, segment, and edge detection. In addition, this display provides readouts for two measurement values simultaneously.
Features
Preset/offset
Sets the currently displayed measurement value to zero or a specified numeric value. This is useful, for example, if a difference in the diameters of a reference gauge and a workpiece is to be allowed for in calibration, or if a dimension of a workpiece that exceeds the measurement range of the LSM is to be measured.
Mastering
For continuous processing of high-precision workpieces, fine-adjusting the preset or offset value is called mastering. By specifying a mastering value, the total correction will be (zero-set/offset value) + (±mastering value). If a positive mastering value is specified, the displayed value for a workpiece diameter measurement will be greater than the actual value. If a negative value is specified, the displayed value will be smaller than the actual value.
Sample measurement
On a sample measurement, the number of measurements will be defined (in the range of 2 to 999) in advance. From this sample, measurement various calculation results (mean, maximum, minimum, and range) can be derived. These measurements can be used for runout measurements on a revolving workpiece and simplified cylindricity measurements.
Arithmetical average/moving average
Arithmetical/moving average modes are provided to obtain the average of measurement values. On this type of LSM, either of them can be specified before starting measurement. In the arithmetical average mode, the number of scans over which to take an averaging can be set at one of twelve steps between 1 (0.32 ms) and 2048 (0.64 seconds). In the moving average mode, the number of scans can be set at one of seven steps between 32 (0.01 seconds) and 2048 (0.64 seconds), and the measurement value will be updated every sixteen scans on and after the second measurement, irrespective of the specified number of scans for averaging. The latter mode is suitable for judging the trend in the diameter or width of an endless workpiece, such as wire or tape from a measurement that requires a long period.
Automatic measurement using edges
The edges created by scanning a workpiece can be used to program an LSM. A maximum of 127 workpiece features, and 127 of the spaces between these features, can be used, which involves a total of 255 edges. This is most useful for measuring such things as IC chip leads or connector pins that are approximately equally spaced. This method cannot be applied to transparent objects.
Abnormal data elimination
If a piece of data significantly exceeds the tolerance limit because the workpiece or measuring unit is contaminated by a water droplet, oil droplet or dust, the piece of data will be automatically removed by this function.
Simultaneous (dual-program) measurement
It is possible to measure two items simultaneously with one laser scan micrometer unit, and to output the data. This function can be used to simultaneously measure the outside diameter and runout of a bar that is rotating, or to measure the outside diameters of two cylinders or wires at the same time.
Applications
| Display | 9-digit LED (for measurement) and 8-digit LED (sub-display) |
| Designation | Segments: Segment 1 to 7 (Segment 1 to 3 for transparent objects) Edge: 1 to 255 edges can be detected |
| Averaging Times | Arithmetical average: Per 1 to 2048 Moving average: Per 32 to 2048 |
| Go/No-Go Judgment | Nominal value ±tolerance setting, upper and lower limits setting, multi-limit setting |
| Measurement Mode | Waiting, single measurement, continuous measurement |
| Statistical Calculation | Available when connecting an external PC via the RS-232C or USB interfaces |
| Data Output | USB2.0, RS-232C and I/O-analog interfaces |
| Operating | Temperature: 32 to 113°F (0 to 45°C) Humidity: 35 to 85% RH (with no condensation) |
| Power Supply | 24 V DC ±10%, 1.3 A (sold seperately) |
| Dimensions | 8.57 x 5.67 x 2.83" (217.6 x 144 x 72 mm) |
| Weight | 3.08 lbs (1.4 kg) |
Everything you need to know about orders, cancellations, refunds, and delivery.
EquipTestPro ships to both Canada and the United States. We are pleased to serve customers across North America with reliable, trackable delivery options.
When you place an order, a flat-rate shipping charge will be applied at checkout based on your order. The applicable rate will be clearly displayed before you complete your purchase.
Flat-rate shipping is calculated to reflect the cost of reliable, insured delivery. The rate shown at checkout is final — no hidden surcharges will be added after your order is placed.
For certain items, shipping costs are calculated based on the weight of the product. The weight of any weight-based item is listed on its product detail page.
For example, an item weighing 3.2 lbs will be rated at 4 lbs for shipping calculation purposes. This policy is standard practice across all major carriers we work with.
Some products sold on EquipTestPro are subject to shipping restrictions due to regulatory, carrier, or safety requirements. These include but may not be limited to:
Where restrictions apply, this will be clearly noted on the product listing. If you have questions about a specific product's shipping eligibility to your location, please contact us before placing your order.
Orders are processed on business days (Monday through Friday, excluding statutory holidays). Orders placed after business hours or on weekends will begin processing the following business day.
You are entitled to cancel your Order within 30 days of receipt without providing a reason, subject to the processing fee structure described below.
The cancellation deadline is 30 days from the date on which you received the Goods, or on which a third party appointed by you (other than the carrier) takes possession of the delivered product.
To exercise your cancellation right, notify us with a clear written statement by:
The following fee structure applies to all cancellations. Please review carefully before requesting a cancellation.
A processing fee of 10% of the total order value will be withheld from your refund to cover payment processing, handling, and administrative costs.
If we cancel your order due to item unavailability, no processing fee will be withheld. You receive a full refund of the amount paid.
Refunds will be issued using the same payment method as the original purchase. No additional fees beyond those described above will be applied.
To be eligible for a return, all of the following conditions must be met:
We reserve the right to refuse returns of any merchandise that does not meet the above conditions, at our sole discretion.
The following items are not eligible for return under any circumstances:
You are responsible for the cost and risk of returning Goods to us. Before sending any items, please contact us at info@equiptestpro.com to obtain the return shipping address.
You should expect to receive your refund within four (4) weeks of delivering your return package to the shipper. In many cases, refunds are processed sooner. The timeline breaks down as follows:
We will process refunds no later than 14 days from the day we receive the returned Goods, using the same payment method as your original purchase.
If the Goods were marked as a gift at the time of purchase and shipped directly to you, a gift credit equal to the return value (less any applicable processing fee) will be issued. Once the returned product is received and inspected, a gift certificate will be mailed to you.
If the Goods were not marked as a gift at purchase, or if the gift giver had the order shipped to themselves first, the refund will be issued to the original purchaser.
Reach out to our support team for assistance with any order or return.
Not Applicable
| Condition: | NA |
Defective new equipment may be returned for warrantyrepair/exchange to us within (5) days of the shipment receipt date. After five (5) days, returns will be handled by direct contact and in accordance with the warranty terms of the item's manufacturer. Items that have malfunctioned due to mishandling, electrical overload, etc., will be subject to repair charge.
Non defective new equipment will be authorized for return within five (5) days of the shipment receipt date if the equipment is still in new, re-sellable condition with the original manual(s), accessories, packing material and carton. We reserve the right to reject returnsin which there is no original packaging, missing accessories, damage or visible signs of usage of the item. A restocking fee of up to 25% of purchase price may apply. Special orders and dangerous goods are non-returnable.
(Do not write anytingon the manufacturer's original package or use as a shipping carton. Include all accessories, manuals and warranties.)
Please, include a copy of the packing list or invoice with a reason for the return. Your return authorization number is valid for thirty (30) days.